Installing the root server
The root server is the first COS server to be installed in the COS network. The root server manages the common configuration and may include library and project databases. You can only install one root server in a COS network; the other servers must be installed as replica servers.
Prerequisites
-
To enable encrypted communication using OpenSSL, you need a valid SSL key (.key) and SSL certificate (.crt).
Do the following:
-
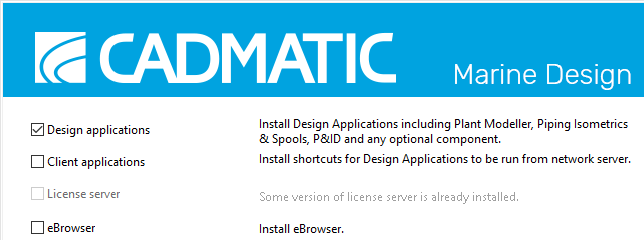
In the CADMATIC Marine Design Installation setup program, select Outfitting installation. The list of applications opens.
-
Select Install/upgrade COS server, and click Next.
-
On the license agreement page, read the license agreement and click Yes to accept it.
Note: If the Installed COS Servers dialog opens and shows that there is a COS root server already installed, select the option Uninstall. Then continue again from the Install/upgrade COS server option, and click Next.
-
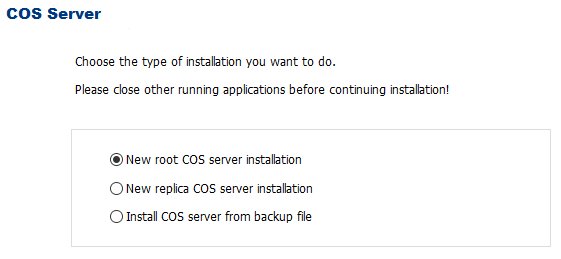
On the COS server setup page, select New root COS server installation.
Click Next.
-
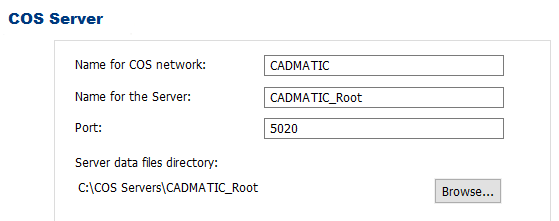
On the server properties page, define server information as follows:
- In the Name for COS network field, enter a name (without spaces) for the COS network. It is recommended to use your company’s name or the branch of industry. As you type, the same name is automatically added in the Name for the Server field.
-
If necessary, modify the root server name in the Name for the Server field. Do not use spaces in the server name. Root server can also be named according to your company or branch of industry.
-
In the Port field, enter the TCP/IP port that clients will use to connect to the server. Ensure that the port is not blocked by a firewall.
-
Server data files directory displays the location of the server's data files. If necessary, click Browse to change the directory.
-
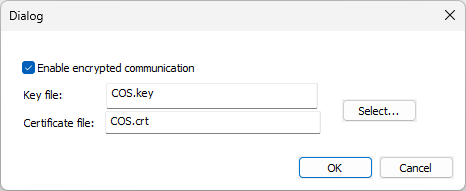
Communication encryption is Off by default. If you want the server to encrypt all communication, click Settings, select Enable encrypted communication, select the key file and certificate file, and click OK. The key and certification files are stored in the server data files directory.
-
If you are using the server for Hull projects, select Enable HCA and define the following:
- HCA Port – The port that Hull COS Agent uses.
- Service Account – Define the user name and password for the account. Another Account is selected by default and cannot be changed, as local systems do not have access to network drives.
-
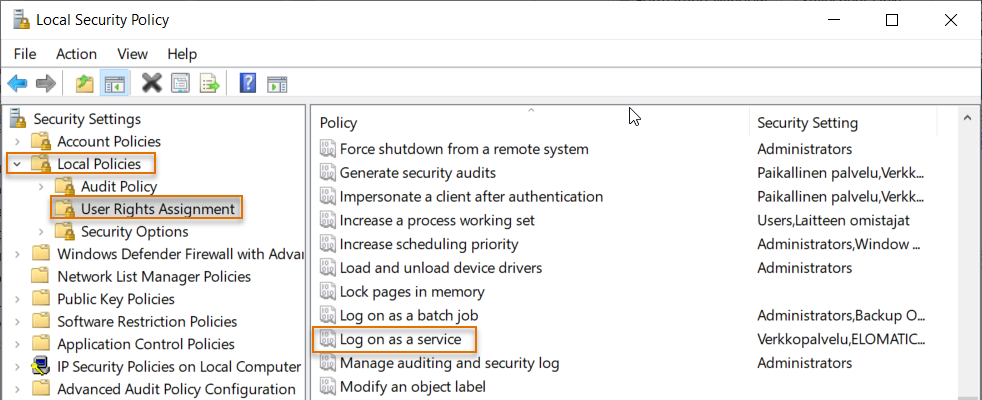
Open the Local Security Policy application.
-
Expand Local Policies, and select User Rights Assignment.
-
Double-click Log on as a service.
-
Click Add User or Group. The Select Users, Computers, Service Accounts, or Groups dialog opens.
-
Add the desired account, and click OK.
In order for the HCA to start, the account needs to be able to log on as a service.
 Show/hide procedure
To grant the permission to log on as a service, do the following:
The Log on as a service Properties dialog opens.
Click Next.
-
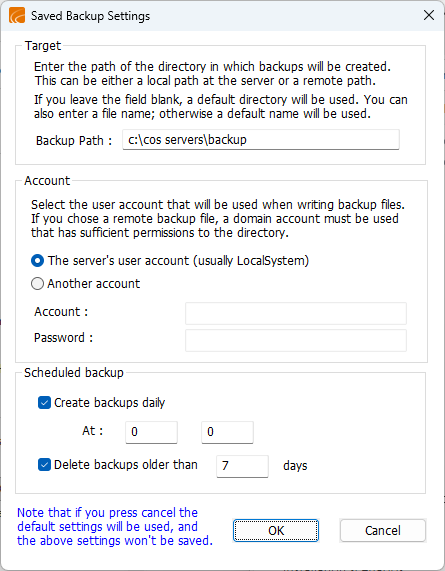
In the Saved Backup Settings dialog, define the backup information as follows:
-
In the Target section, define the Backup Path where backups will be created. The default path is c:\cos servers\backup.
-
In the Account section, select whether the COS server's user account or another account is used when writing backup files.
-
In the Scheduled backup section, define when backups are created and how long the backups are kept.
Click either OK to save the new settings or Cancel to proceed with default settings. You can change the server's backup settings later in the CADMATIC Desktop from Object > Manage COS Servers > Server control > Backup tab.
-
-
The Installation Summary page opens, showing you the settings you have defined.
-
On the Installation Summary page, click Yes to continue.
-
On the COS Server Administrators page, click Create Administrator to add new administrators, if necessary. Otherwise click Next.
-
Click Exit. The root server is now installed.
The Installed COS Servers dialog opens, showing the new root server. The COS prefix is always added to the name by default.
The colors in the server list indicate the state of the COS server: green if running, and red if stopped.
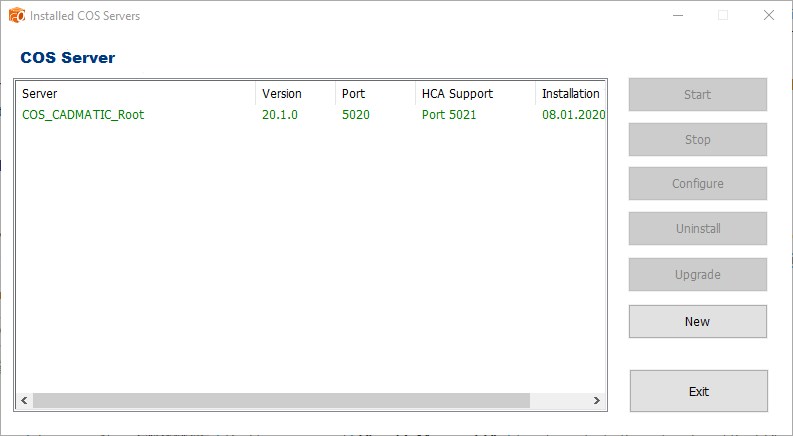
You can later open the Installed COS servers dialog by selecting Install/upgrade COS Server from the installer. In addition to viewing all the installed servers, you can stop, start and uninstall servers. With Configure, you can manage the data and backup directories, for example. With New, you can add new COS servers.
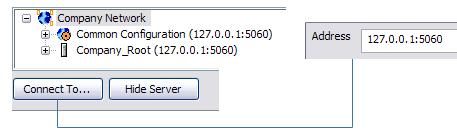
In the CADMATIC desktop, select Object > Manage COS Servers to administrate the COS network and its COS servers.
-
To display a new server in this tool, select Connect.
-
When a COS server has been uninstalled, select Remove to remove it from this tool.
Note: The CADMATIC desktop comes with the Outfitting client applications. Install the CADMATIC desktop from the CADMATIC Marine installer by selecting Outfitting installation. The list of applications opens. Select Design applications and install them.